Cloud-Folder
Info
This feature is available starting from version 2.5.0.0 of Grafcet-Studio.
Cloud folder possibilities
With the Cloud folder you have the following possibilities:
- Store up to 500 Grafcet projects in your personal cloud folder on the Internet.
- Share Grafcet projects with other Grafcet Studio users through a share code. Specify whether to have read only or write permissions as well.
- Manage your Grafcet projects and assign tags (search terms) for each project and use filters.
- A Share Code can refer to specific files or to tags (search terms).
- You can share a Share Code with reading rights to make files available.
- You can share a Share Code with write rights to a person who can revise your project.
- Educational institutions can provide Grafcet projects to students and also update them at any time without having to send files.
Important
Saving projects in the Cloud is only possible if your Software Subscription is valid. If it is no longer valid, then you can only load projects from the cloud folder. If this has already expired for more than 1 year, then you can also no longer load the projects. After purchasing the software, the software subscription is valid for 1 year. After that you can buy a cost effective software subscription for 1 year.
The Cloud Folders Window
You open the cloud window via Open->Cloud window ... or with Shift+Ctrl+O.
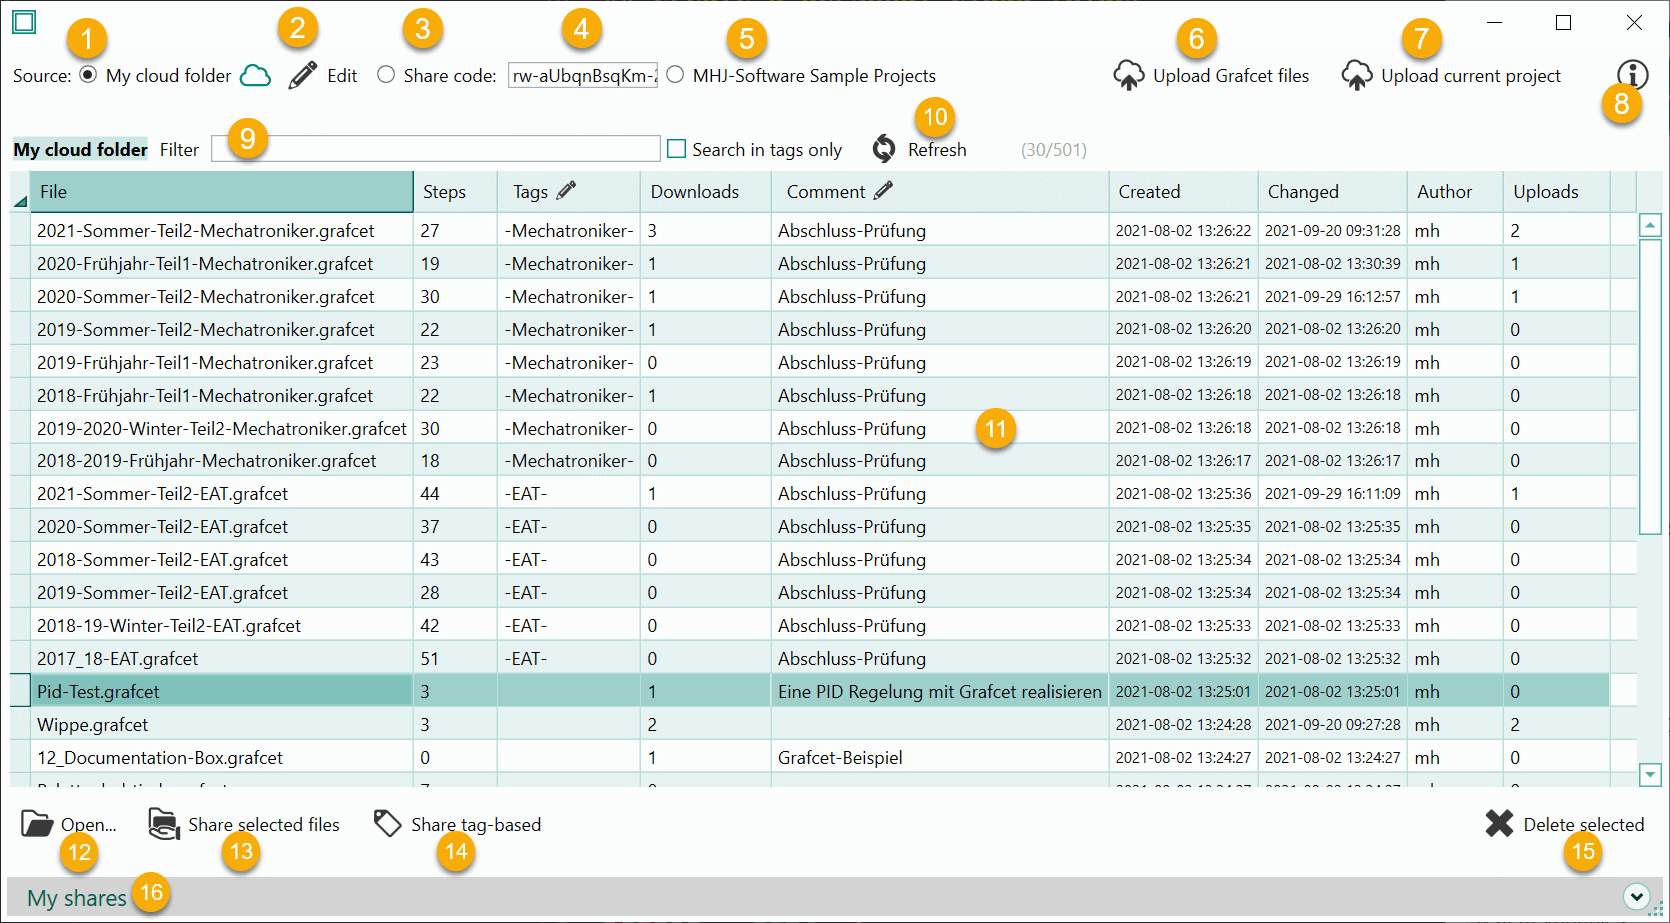
| Item | Description |
|---|---|
| 1 | My Cloud folder: The files of the cloud folder will be shown. |
| 2 | Button Edit: Edit/change the cloud folder |
| 3 | Share Code: Files are to be displayed via a Share Code. |
| 4 | Edit field for the Share Code |
| 5 | MHJ-Software: The sample projects of MHJ software should be displayed. |
| 6 | Button for upload Grafcet-Files. Multiple files can be uploaded. |
| 7 | Button for upload current project |
| 8 | Show this Help |
| 9 | Filter: Table can be filtered by using a search term. |
| 10 | Button Refresh: Read data base content |
| 11 | Table of the files of the selected source |
| 12 | Button Open. Selected row (Grafcet-File) is loaded and opened. |
| 13 | Button Share selected files. Create a Share Code for the selected files. |
| 14 | Button Share tag-based. Create a Share-Code 'tag-based'. |
| 15 | Button Delete selected. Delete the selected files. |
| 16 | The My Shares area can be expanded. Display of the existing Share Codes. |
Create a personal cloud folder
To be able to store files in the cloud, you need a own cloud folder. You can create this folder within seconds:
Edit button:
![]()
- Open the Cloud Window via Open->Cloud Folder....
- Press the Edit button
- Enter your desired author abbreviation
- Select the target directory. This is the directory the files will be copied to when you load files from the cloud.
- Expand the lower area.
- Enter your email address and press the button Request access code for cloud folder. You will now receive an email with the access data. If the email address has not been used with a cloud folder before, a new cloud folder will be created. Important: Save at least 1 file in your cloud folder within 24 hours, otherwise the sent passwords will be invalid again. In this case you will have to repeat this process.
- Copy the Read/Write password from the email into the access code field.
Info
You can do point 6 again and again if you need the access codes for your cloud folder.
Dialog Edit:
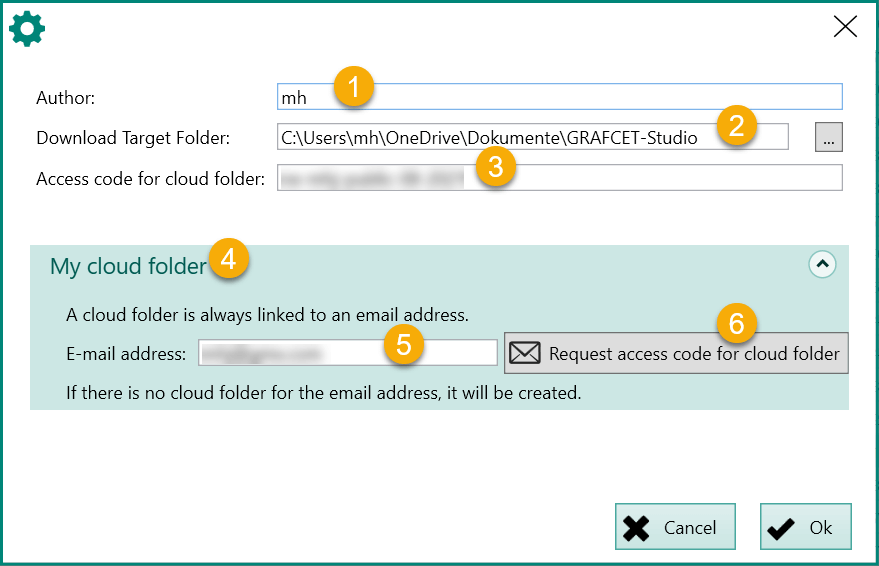
| Item | Description |
|---|---|
| 1 | State 'Author'. When you upload files, this text appears in the 'Author' column. |
| 2 | Insert here the target folder for the downloads. |
| 3 | Enter here the Password (with read/write permissions) for your Cloud Folder. You have received this code by email. See point 6. |
| 4 | Allows you to expand/collapse the Cloud Folder area. |
| 5 | Enter here the email address to be associated with your personal cloud folder. |
| 6 | With this button you can create the cloud folder. All codes will be sent to you by email in a few seconds. |
Your personal cloud folder will now be created. You will receive the passwords via email within seconds. Paste the password with read and write permissions (starts with 'rw-') into Access code, point 3. Now you can save projects to your personal cloud folder. See next section.
Tipp
If you have lost the access code, then perform these steps again. You will then receive the email again with all the information.
Table Cloud-Files
This table displays all files provided by the selected source.
Possible sources:
- My Cloud Folder. Source is the personal cloud folder associated with an email address.
- Share code. Source is a share code.
- MHJ sample projects. Source is the Grafcet examples of MHJ software.
The table has the following columns:
| Column | Description |
|---|---|
| File | Name of the file |
| Steps | How many steps does the Grafcet project have? |
| Tags | Any tags (max. 80 characters). A tag is a search term. Example: -station101- |
| Downloads | Number of downloads/usages |
| Comment | Any remark of the author (max. 80 characters) |
| Created | When was the file uploaded for the 1st time? |
| Modified | When was the file last uploaded? |
| Creator | The author (max. 50 characters) |
| Uploads | How many times was a file uploaded and overwritten? |
The filter can be used to search in the table. Switch on Search in tags only so that only the Tags column is searched.
The Refresh button must be pressed only 1 time if the source has been changed. When changing the filter, this button is not necessary.
Saving Grafcet projects in the cloud folder
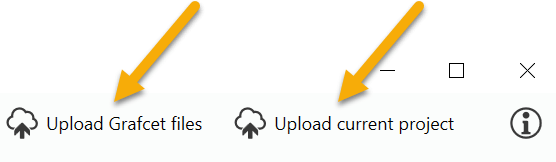
Mit dem Button Grafcet-Files hochladen können Sie mehrere Files hochladen und mit dem Button Aktuelles Projekt hochladen können Sie das aktuell geöffnete Projekt in Ihren Cloud-Ordner hochladen. Falls die Datei bereits existiert erscheint eine entsprechende Meldung. Wenn Sie fortfahren, wird diese überschrieben und die Eigenschaft Geändert und Geändert Anzahl werden in der Tabelle aktualisiert.
Folgende Bedingungen müssen erfüllt sein, damit Sie das aktuelle Projekt hochladen können:
With the button Upload Grafcet files you can upload multiple files and with the button Upload current project you can upload the currently opened project to your cloud folder. If the file already exists a corresponding message will appear. If you continue, it will be overwritten and the Changed and Uploads column will be updated in the table.
The following conditions must be met in order to upload the current project:
- The personal cloud folder is selected as the source. A read/write access code is stored in the settings.
- Or: A Share Code is selected as the source and a read/write Share Code is entered.
- The software subscription for the license is valid.
You can upload multiple projects using the Upload Grafcet Files button only if the personal cloud folder is set as the source.
Info
You can upload a maximum of 500 files. You need more? Then contact us.
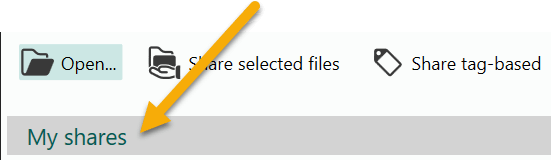
Open and delete projects from the cloud folder
Directly below the table you will find the Open button. Select 1 row in the table and press this button. The file will be loaded and copied to the target directory and then opened. Alternatively, you can also open with a double click when the 1st column is clicked. If the target file already exists, you will be asked if the file should be overwritten.
Via the Delete button (below the table on the right) you can delete files from your cloud folder. Deleted files cannot be undone If a file has been deleted that is linked to a share code, it will no longer be displayed. The Delete button will only appear if your cloud folder is selected as the Source. (This operation will not delete files stored on your computer, of course).
Share projects with other Grafcet Studio users
You can share files with other Grafcet-Studio users via a Share Code. You can either share specific files (selected-based) or share files via a search term (tag-based).
Creating a share is only possible when the personal cloud folder is selected as the source.
For each share, a share code is created that you can send to other Grafcet Studio users.
All existing share codes are listed in the table below.
Image: Here you can expand the lower table:
Share selected files
If you want to share e.g. file A and file B, then select these files in the table. Now press the Share selected files button. A share code will be created, which you can now see in the table in the My Shares area after you press the Refresh button. Newly created shares always appear in the first position.
Select the new row and press the Read button. The share code will now be copied to the clipboard. You can now send the code by email. The recipient must enter this code in the Share Code field and will then have read access to the files.
Info
With the CTRL key you can select multiple files that are not under each other. You can also share a share code with Read and Write permission. To do this, press the Write/Read button below the table.
Hinweis
If you want to share other files, then you need to delete the existing share and create a new one.
As soon as you delete a share code in the table it will become invalid and can no longer be used.
Share 'tag-based' files
With Tag based sharing you can share files that match a search term in the Tags column.
Tipp
Make sure you choose the search term so that files are not accidentally shared that should not be shared.
There is no case sensitivity.
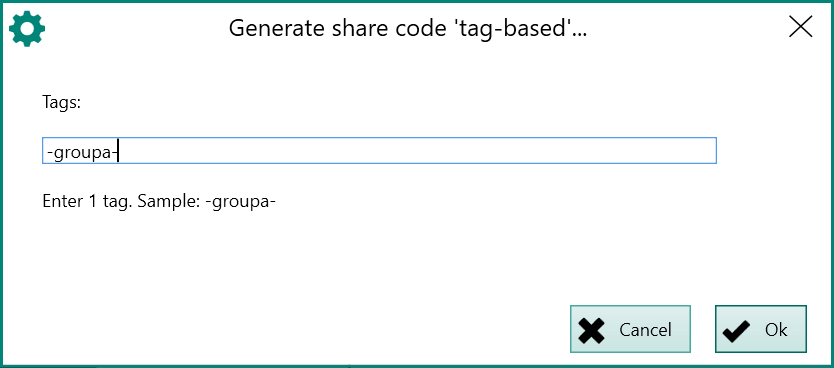
First decide which files should be shared. Then edit the 'Tags' column (RETURN key) and enter a specific search term here (e.g. "-GroupA-"). Once this is done, check the search result by entering the search term in the filter and turning on the Search only in tags option. Now the files found by the tag search will be displayed. If you are satisfied with the result, copy the filter to the clipboard and press the Share Tag-based button. Paste the text from the clipboard into the input field and confirm the dialog.
In the My Shares table (bottom of screen) you will now find the new share code in 1st place.
So that other people can open the files you have to pass on the share code. Select the line and press the Read button. This copies the share code with read permission to the Windows clipboard.
Check the share by entering the share code as the source at the top of the window.
Note
With this code, the tags column of a file determines whether it will be displayed in a tag-based share code or not. The number of files that are shared as a result may change after the share code is created. This is the advantage of this sharing type.
Table 'My Shares'
This table lists the available share codes:
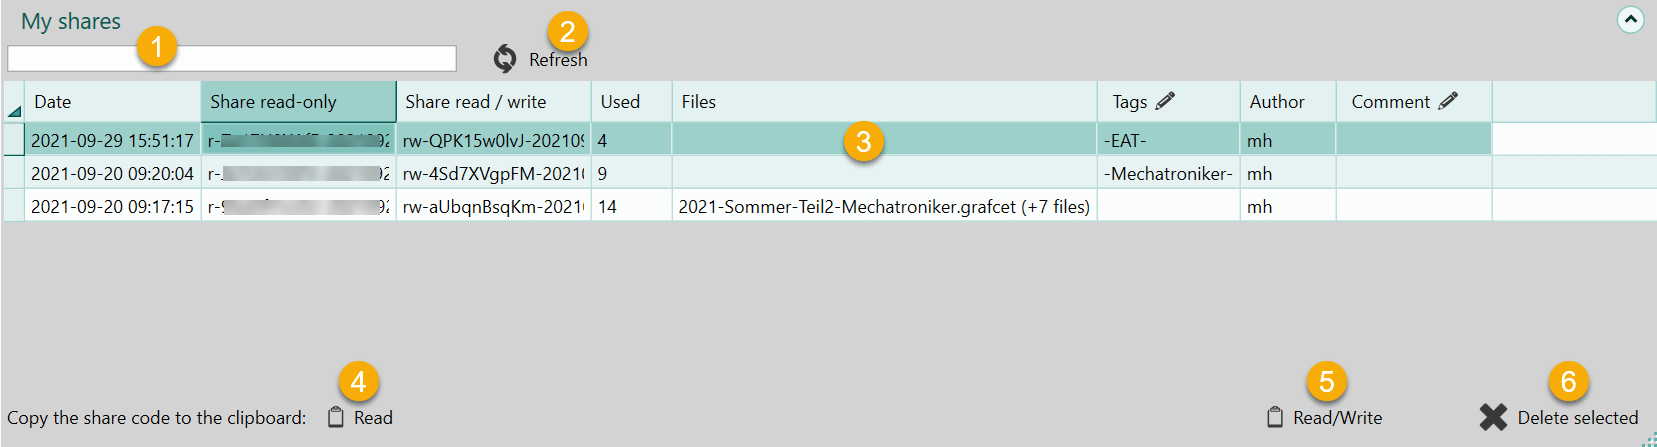
| Item | Description |
|---|---|
| 1 | Filter input field for table. (The Refresh button does not need to be pressed). |
| 2 | Refresh the content of the table. |
| 3 | Table with Share Codes |
| 4 | The read share code of the selected row is copied to the Windows clipboard. |
| 5 | The read/write share code of the selected row is copied to the Windows clipboard. |
| 6 | The selected share code is deleted. |
Wenn in der Tabelle die Spalte 'Tags' ausgefüllt ist, dann handelt es sich um eine Tag-basierte Freigabe. Sie können die Spalte Tags nachträglich ändern. Durch Einfügen eines Tags in dieser Spalte kann aus einer Freigabe für selektierte Dateien eine Tag-basierte Freigabe gemacht werden.
Wenn Sie eine Zeile löschen, dann kann dessen Freigabecode nicht mehr verwendet werden. Er wird sofort ungültig.
Die Spalte 'Verwendet' gibt an, wie oft eine Freigabe benutzt worden ist.
If the 'Tags' column is filled in the table, then it is a tag-based share code. You can change the Tags column afterwards. By inserting a tag in this column, you can turn a share code for selected files into a tag-based share code.
If you delete a row, then its share code can no longer be used. It becomes invalid immediately.
The 'Used' column indicates how often a share has been used.