Grafcet DIN EN 60848 on the Revolution Pi by Kunbus GmbH

Read here how to use the Grafcet Engine on the Revolution Pi and then download and run a Grafcet chart.
General
Info
You need Grafcet-Studio version 1.0.3.0 or newer! Available from: 07.12.2018
Introduction
The company Kunbus offers a modular control system based on industrial Raspberry Pi hardware on DIN rail: Revolution Pi (RevPi). More information about the hardware can be found here.
With Grafcet-Studio this control system can be programmed by a Grafcet-Chart (DIN EN 60848) visually. This is made possible by porting the Grafcet Engine into the scripting language Python (V3). The Grafcet Engine is the Runtime module, which processes the Grafcet logic. The runtime is free of charge for the device. With a Grafcet Studio full version (e.g. 99€ plus VAT for the IoT edition), any number of Raspberry Pi's can be visually programmed. In order to enable Grafcet-Studio to program the RevPi, a Python script (the Grafcet-Engine) has to be started on the device.
The Python script has the following tasks:
- Communication between Grafcet-Studio (Editor) and the Grafcet-Engine (Runtime) via MQTT
- Data exchange of inputs and outputs with the graphcet engine
- Cyclic call of the Grafcet Engine to process the Grafcet logic.
The following figure shows Grafcet Studio in monitoring mode (debugging). Here a permanent data exchange between RevPi and Grafcet-Studio takes place. On the left side of the drawing area you can see a small step chain that generates a moving light. To the right a variable (symbol) is incremented, with a rising edge of I0.
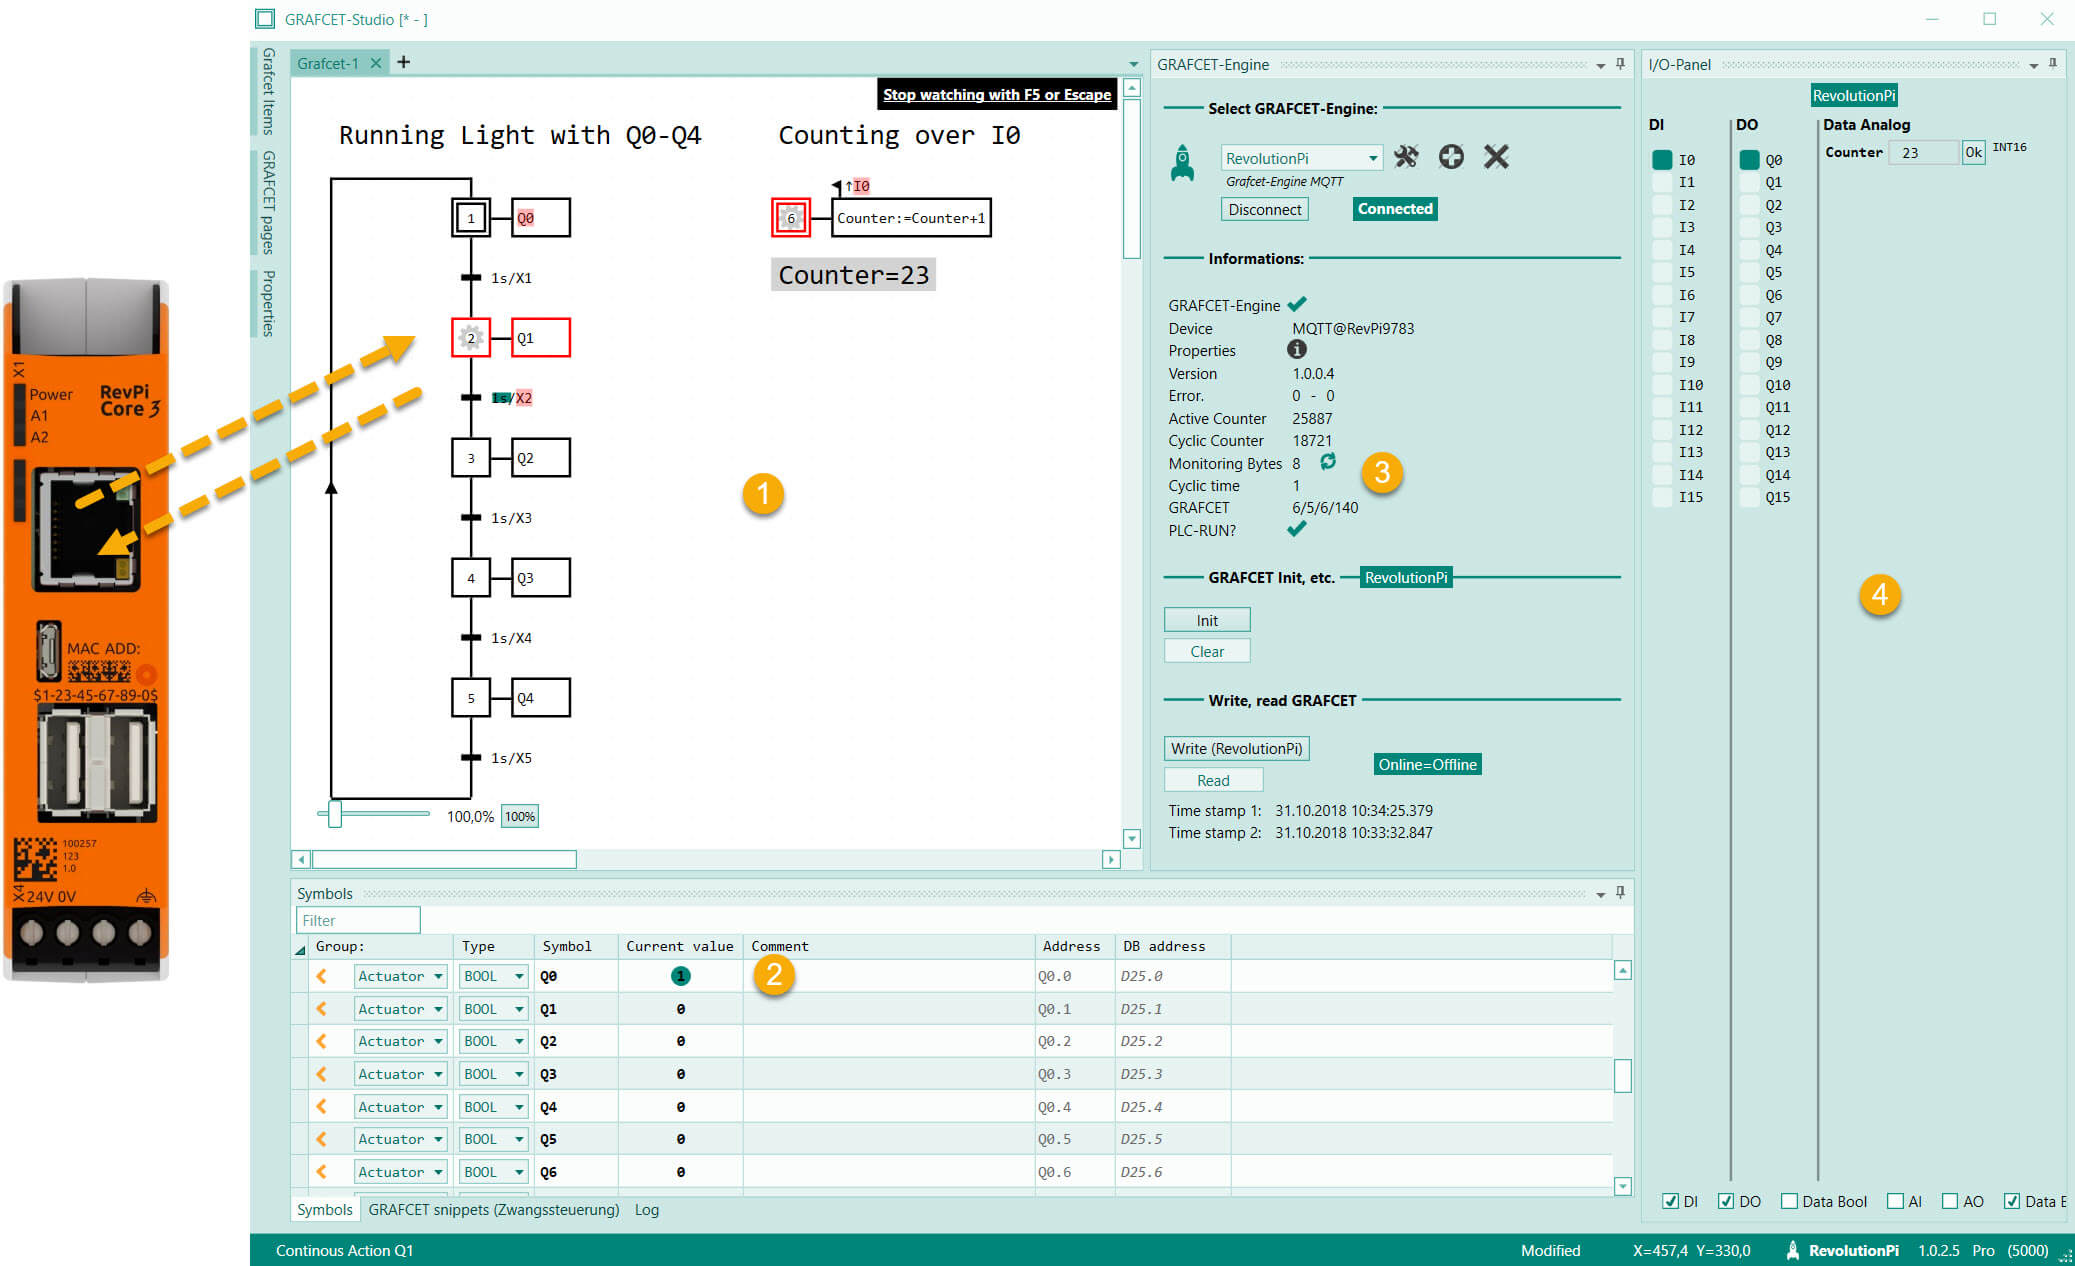
| No. | Explanation |
|---|---|
| 1 | Drawing area (canvas) of Grafcet Studio. |
| 2 | Symbol table. (Symbol names can be changed.) |
| 3 | View of the Grafcet Engine (Runtime). Here you can see, for example, the current cycle time, which in this case is 1ms. |
| 4 | IO-Panel with current states of all variables including inputs and outputs |
Advantages of Grafcet Studio
- Visual programming and debugging of the RevPi.
- Simple and reduced user interface (UI) in Grafcet Studio (= simple usage).
- Use of the standard Grafcet DIN EN 60848: This standard is part of the curriculum of many technical professions in Germany.
- The Grafcet chart is documentation and the control program at the same time.
- Simulator integrated: You can simulate the Grafcet logic before transferring the Grafcet to the Device without hardware.
- Highly convenient development: The program can be transferred to the device within 1 second and runs autonomously there.
- Modern development environment: Vector-oriented UI based on Microsoft Windows Presentation Foundation (WPF).
- Target cross-platform: The created control program can be transferred to another system (S7 control from Siemens or Arduino Due) without changes.
- The Python script allows all available modules to be used in the Grafcet logic.
- It is possible to add Python commands to the Grafcet logic. Example: If a certain event occurs in the Grafcet logic, an Email could be sent via Python.
- Several instances of the Grafcet Engine can be created in the Python script, which are independent of each other. These different instances can communicate with each other if required.
- The Grafcet runtime (Grafcet engine) is free of charge for the device. Only the editor (Grafcet-Studio) must be purchased (e.g. IoT-Edition for 99€ + VAT).
- Grafcet-Studio can be connected to a virtual system/machine in simulator mode. Thus the Grafcet can be checked very efficiently. See YouTube video
Prepare RevPi
Hardware configuration
Connect the desired modules via the backplane bus (PiBridge) and do a hardware configuration with PICtory. PICtory is the web-based hardware configurator of the RevPi. It is started via the browser. All necessary information can be found in the Documentation section on the Kunbus website. To make your work easier, we recommend that you connect a monitor, mouse and keyboard to the RevPi.
Publish inputs/outputs of the hardware to the Grafcet Engine (runtime)
In order for the Grafcet logic to know the states of the input signals (digital or analog), the input states must be written into the Grafcet Engine. The states of the outputs of the Grafcet Engine must be written into the output modules of the hardware. The Grafcet Engine provides the necessary read and write functions for this purpose. In the following Python example, the digital inputs and outputs of a DIO module are published to the Grafcet engine.
I/O Addresses of the Grafcet Engine
The following table shows the start addresses of the individual operand ranges of the Grafcet engine. In the following Python example only digital inputs and outputs are used. The states of the digital inputs must be written from address 0 (see table) and the digital outputs are read from address 25 (see table).
| Operand | Symbol area in Grafcet Studio | Address | Sufficient for ... |
|---|---|---|---|
| DI - Digital Inputs | Sensor | 0 | 200 Inputs |
| DO - Digital outputs | Actuator | 25 | 200 Outputs |
| AI - Analog input | Sensor | 50 | 25 analog inputs (for 2-byte) |
| AO - Analog output | Actuator | 100 | 25 analog outputs (for 2 byte) |
| Data - Bool Variables | Data | 150 | 200 Boolean variables |
| Data - Analog Variables | Data | 175 | 50 (e.g. 50 Int16 Variables) |
Note: If an area is too small, it can be extended via the device settings in Grafcet-Studio. In this case the start addresses would shift.
The process image of the RevPi
In order to read/write the hardware inputs/outputs in the Python program their addresses (offset) must be known in the process image of the RevPi. These offset addresses can be determined by exporting the symbols in PICtory. In PICtory, select the menu item File->Export. In the dialog select Export 02 Offset list and select Show only:
| Offset list, select 'Show only'. | The Offset list is displayed |
|---|---|
 |
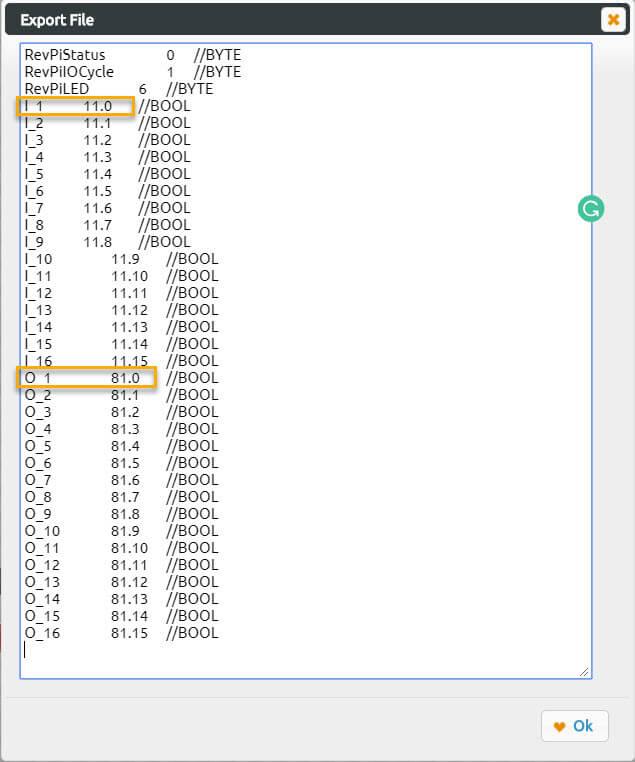 |
You will see the start address of the inputs and outputs and (indirect) their length in bytes. This information is needed for the Python script.
Customize Python script
Download the following ZIP file:
In the ZIP file you will find these files:
- grafcet_RevolutionPi.py.py = Here an instance of the Grafcet engine is created and called in a loop. A DIO module is used as an example.
- GrafcetEngineRuntime.py = Grafcet-Engine as Python code. The example uses this library.
Below the Python script grafcet_RevolutionPi.py, which manages a DIO assembly:
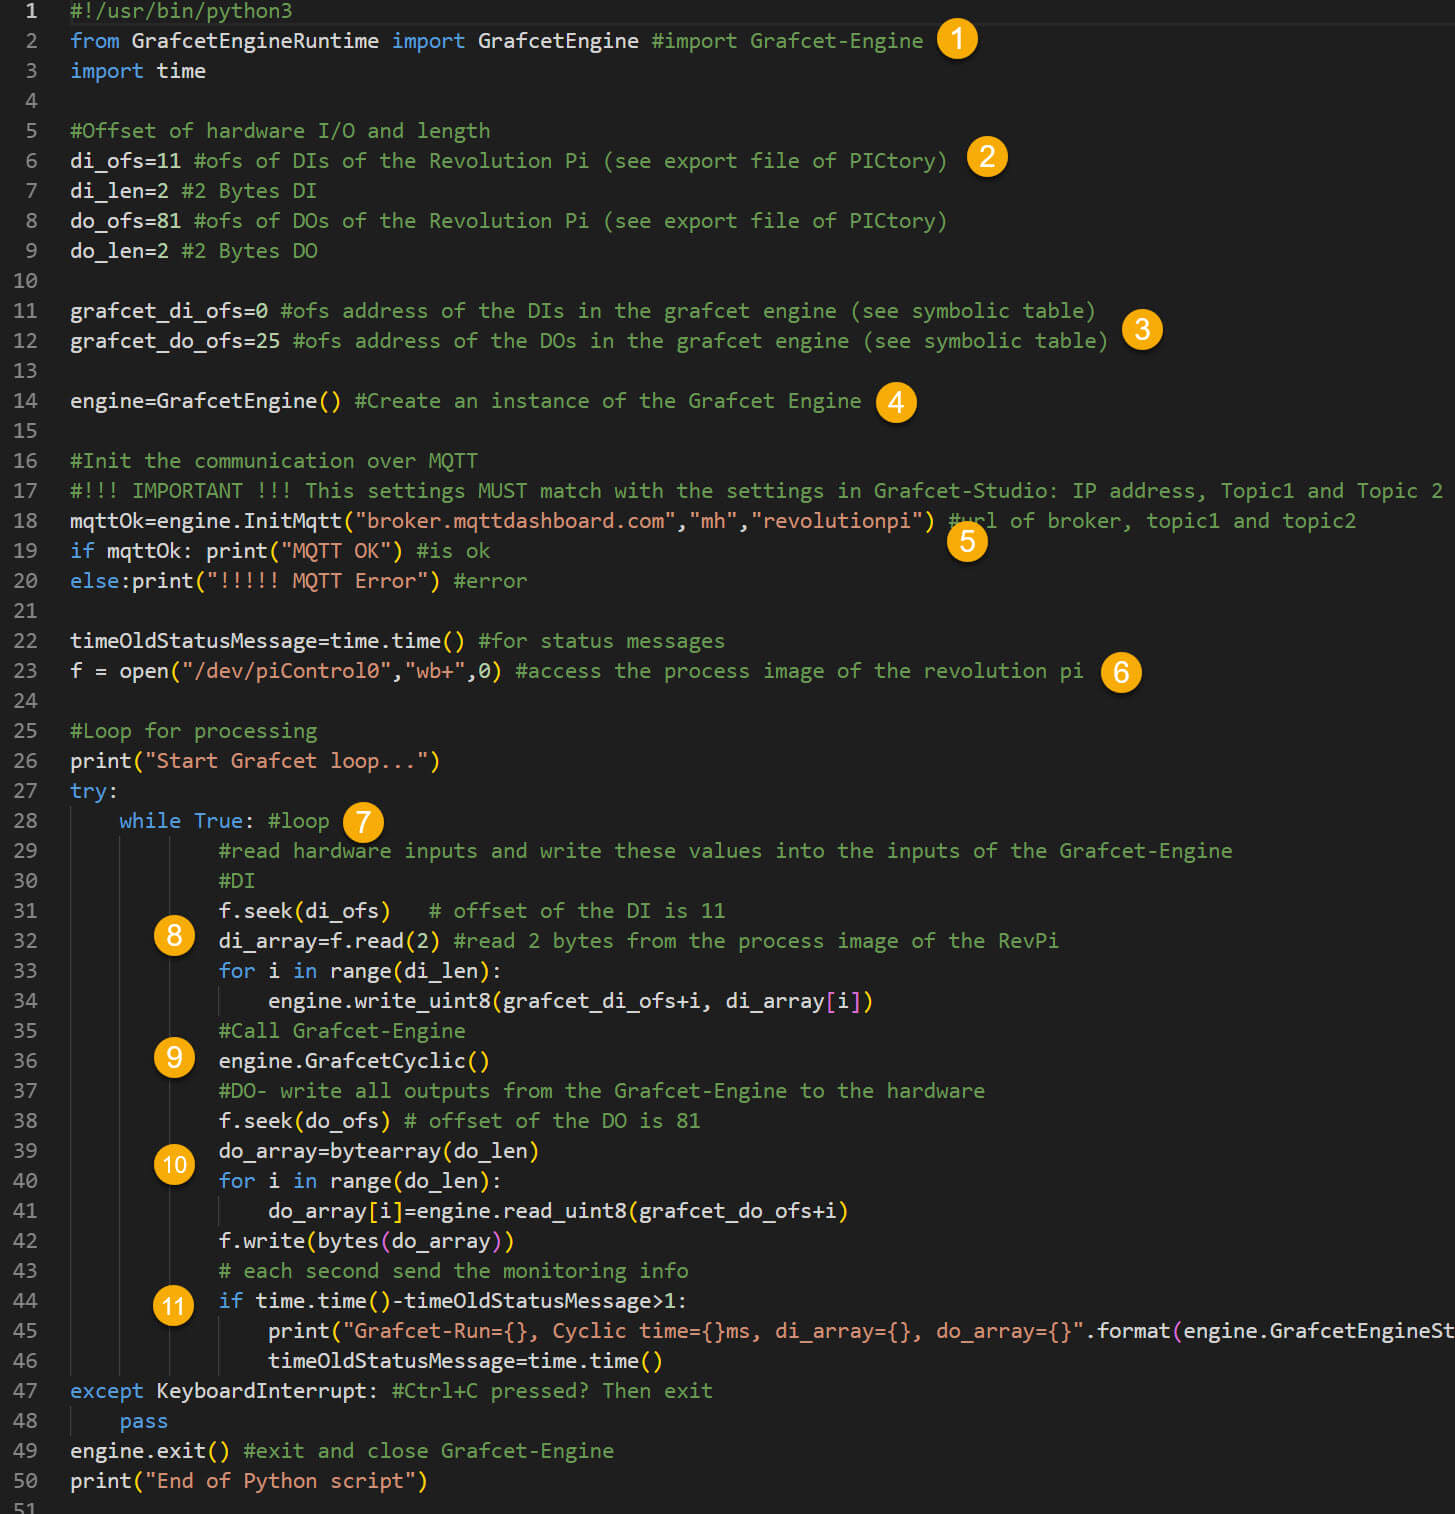
| Step | Explanation |
|---|---|
| 1 | The Grafcet engine (runtime) is imported. |
| 2 | The offset addresses of the RevPi hardware (DIO module) are defined. |
| 3 | The offset addresses of the DI,DO in the Grafcet engine are defined. (See symbol table column DB address in Grafcet Studio). |
| 4 | An instance of the Grafcet engine is created. |
| 5 | The MQTT communication is set up. The specifications must match the specifications in Grafcet Studio. Otherwise no communication can take place. |
| 6 | The process image of the RevPi can then be read and written after 'f=open(...)' |
| 7 | With a while loop a PLC cycle is generated |
| 8 | Read all inputs of the DIO module and write them to the Grafcet Engine Runtime |
| 9 | Execute 1 cyclic of the Grafcet Engine Runtime |
| 10 | Read outputs of the Grafcet Engine and write them to the outputs of the DIO module |
| 11 | Status output |
This example uses a DIO module. If you are using other modules, you must adjust points 8 and 10 in the Python script.
The Grafcet input symbols must therefore be written with the current values of the hardware inputs. and the states of the graphcet outputs are written to the hardware outputs of the R-Pi.
The following read functions are available for Grafcet operands (symbols):
| Read function | Explanation |
|---|---|
| read_bit(addr, bit) | Returns true or false (1 bit) as function result |
| read_uint8(addr) | Returns a byte value (8 bit) as the function result |
| read_uint16(addr) | Returns an unsigned 16-bit integer value as a function result |
| read_uint32(addr) | Returns an unsigned 32-bit integer value as a function result |
| read_int16(addr) | Returns a signed 16-bit integer value as function result |
| read_int32(addr) | Returns a signed 32-bit integer value as a function result |
| read_float(addr) | Returns a float value (32 bit) as function result |
The following write functions are available for Grafcet operands (symbols):
| Write function | Explanation |
|---|---|
| write_bit(addr, bit, bitvalue) | The given value is written at the given address |
| write_uint8(addr, bytevalue) | The given value is written at the given address |
| write_uint16(addr, uint16value) | The specified value is written at the given address |
| write_uint32(addr, uint32value) | The specified value is written at the given address |
| write_int16(addr, int16value) | The specified value is written at the given address |
| write_int32(addr, int32value) | The specified value is written at the given address |
| write_float(addr, floatvalue) | The specified value is written at the given address |
Install MQTT Client
The Grafcet Engine uses the MQTT protocol for communication with Grafcet Studio (on the PC). For this reason, a Mqtt client must be installed on the RevPi. This can be done with the following command: Enter the following command via the terminal:
Info
pip3 install paho-mqtt
MQTT Broker
The Python script uses a public broker: broker.mqttdashboard.com Therefore the RevPi and the PC need internet access. You can also install a local MQTT broker on the RevPi or on the PC. These are available free of charge on the Internet. Then no internet connection would be necessary anymore.
Here you can download a free MQTT Broker for your PC: https://mosquitto.org/download/
In the Python script you then have to enter the IP address of the PC in the 1st parameter of InitMqtt. In the settings of Grafcet-Studio enter the LocalHost address '127.0.0.1' (if the broker and Grafcet-Studio is installed on the same PC)
Start Python script
After the Python script has started, you can now create a Grafcet chart with Grafcet-Studio and transfer it very easily, very quickly and very comfortably to the device.
In the next section you will read how to program and debug the RevPi with Grafcet-Studio.
Grafcet Studio
Create new Device
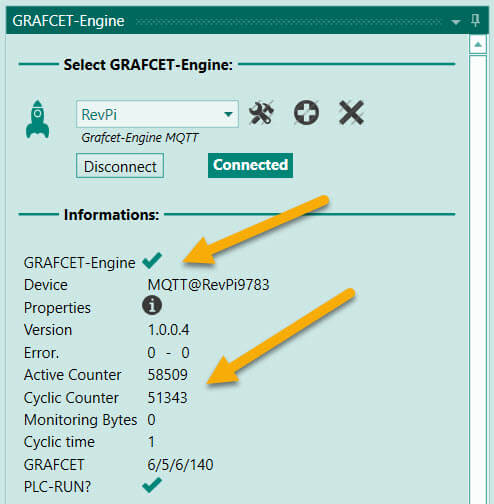
Display the Grafcet Engine window and add a Device for the RevPi:
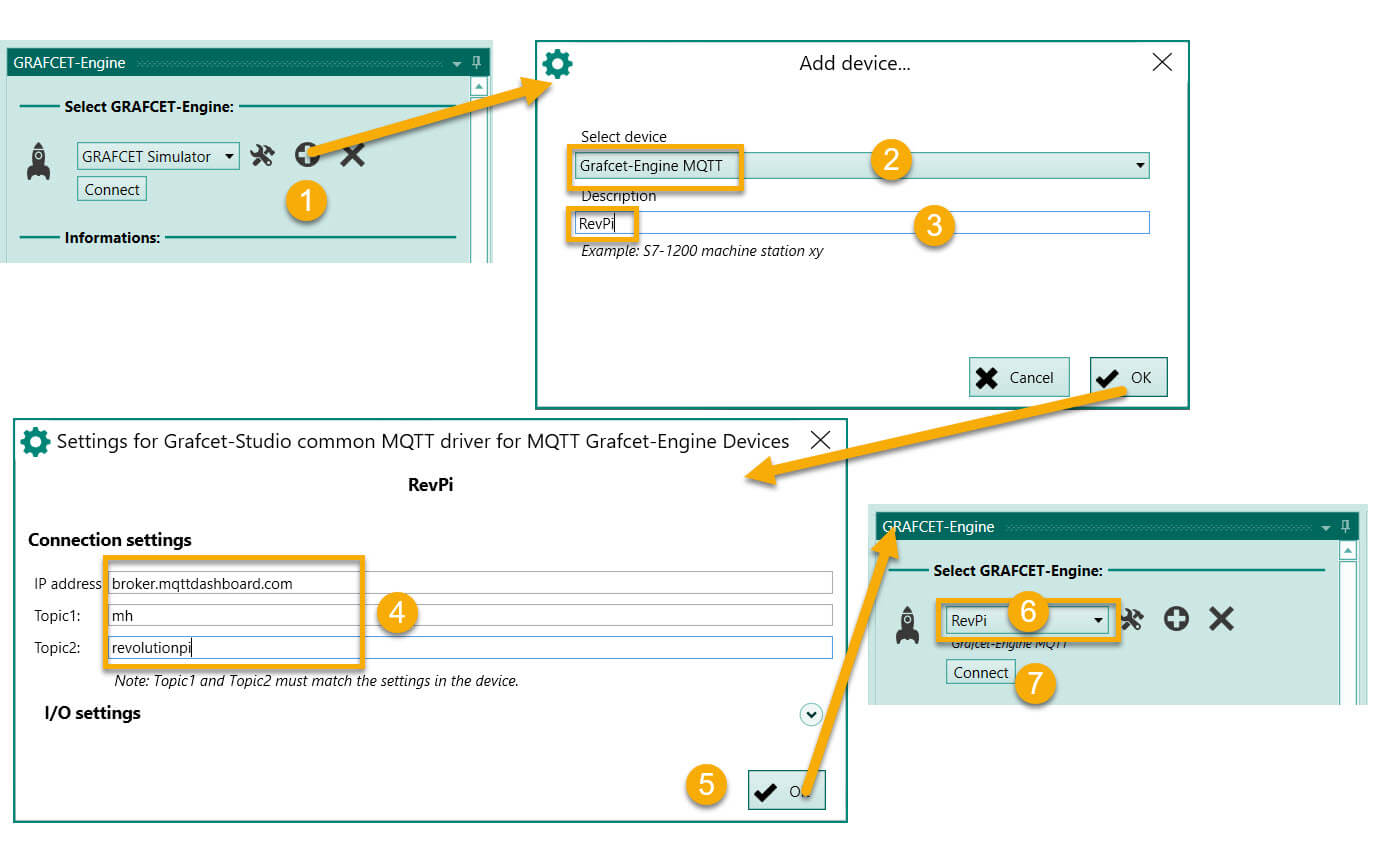
| Step | Explanation |
|---|---|
| 1 | Press the plus button. |
| 2 | Select as device type Grafcet Engine MQTT. |
| 3 | Assign a name for the new Device. |
| 4 | Set MQTT parameters. Topic1 and Topic2 must match the Python script. Do not use the same parameters for Topic1 and Topic2 as in the picture. |
| 5 | OK button |
| 6 | Select the new Device from the list. |
| 7 | Press connect button |
If the Python script is started and if the MQTT parameters are correct, then a connection should be established.
If there is a connection, the counters (see picture) are incremented.
Edit symbol table
In the symbol table you can rename the symbols (variables) according to your needs:
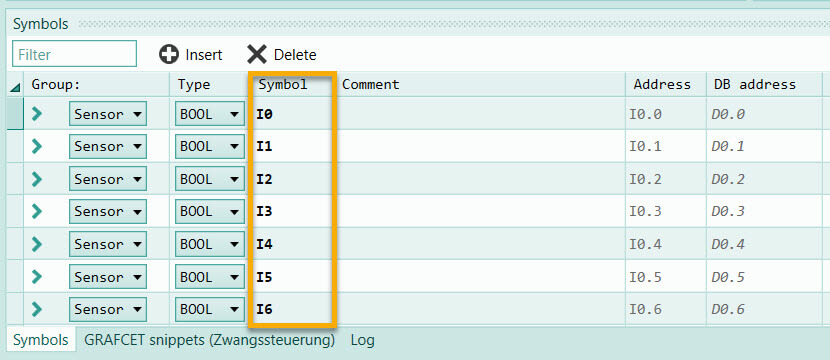
For each symbol you can also set the data type (Bool, Int16, Int32, ...). Via the symbols you can use the inputs and outputs of the RevPi. The prerequisite is, of course, that you have written the inputs and outputs in the Python script into the Grafcet Engine. In the column DB address you can see the offset address of the symbol. This offset address cannot be set manually. It is calculated from top to bottom.
Each symbol can be set to "Sensor", "Actuator" or "Data". Each of these ranges uses a different start offset address in the Grafcet Engine. Inputs should always be set to "Sensor" and outputs should always be set to "Actuator". The "Data" area contains neither inputs nor outputs. Symbols for intermediate results or similar should be stored in this area. Using the Python script, you can access all symbols with read and write operations.
Idea : For example, you can pass the time (hours, minutes, seconds) via the Python script to an input or data symbol. This allows you to evaluate the current time in the Grafcet chart.
Draw Grafcet
A short tutorial can be found here
Or here you find short videos showing how to draw a Grafcet chart with Grafcet-Studio.
Download the Grafcet logic to RevPi
If the connection between RevPi and Grafcet-Studio is established, the Grafcet can be transferred to the Device via the "Write" button:
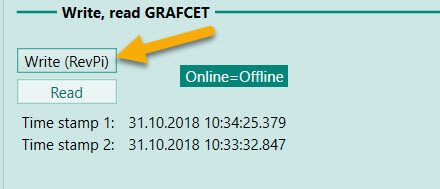
The button is located in the "Grafcet Engine" window.
Watching and debugging
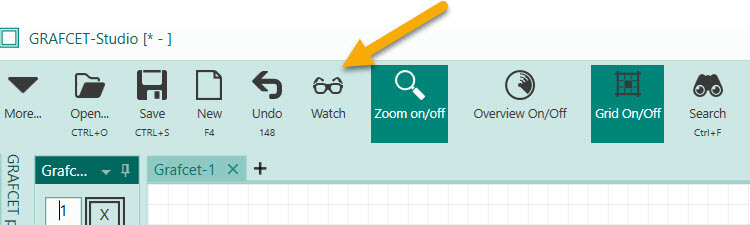
After the Grafcet logic has been written into the device, you can switch on the watch mode by pressing the button with the glasses:
Set up autostart for the runtime
In this way you can start the Python script after booting the RevPi automatically and independently from a user login:
Open the editor 'nano':
Info
sudo nano /etc/rc.local
Insert the following code before the line with exit0:
Info
python3 /home/pi/Documents/grafcet_RevolutionPi.py &
The path incl. file name may have to be changed if you have saved the file in another folder.
Note: The & sign at the end of the line is important! Otherwise the RevPi will not boot completely.
Tip: For example, to see if the Python script is running, you can switch on the A1-Led on the Rev-Pi mmodule in the Python script:
RevPiLed=bytearray(1)
RevPiLed[0]=1
f.seek(6)
f.write(bytes(RevPiLed))
This code can be used in the script grafcet_RevolutionPi.py.
See also Website of the Kunbus company.
Info
You should only set up the autostart if your RevPi is to be used continuously. If a script runs in the background, this leads to problems if you start a second script, which also writes to the outputs. Tip: With the terminal command top you can display all processes. With kill you can remove a process.
What else is important
- If you are using a public MQTT broker, make sure that the parameters Topic1, Topic2 of the function MqttInit (see Python script) are chosen by yourself. Do not use the same strings as in the example. Otherwise it can happen that another person uses the same parameters. An error message will appear when the connection is established.
- Tip: The MQTT Broker could also be a 3rd device (e.g. PC or Linux computer) in your local network.
Checklist
In case of connection problems, please check the following:
- If a local MQTT broker is used: Is the RevPi accessible via the IP address? PC and RevPi must be in the same subnet. Example: RevPi-IP: 192.168.2.118, PC-IP= 192.168.2.101
- Did the Python script start?
- MQTT: Is Topic1 and Topic2 identical in the Python script and in Grafcet Studio (2nd and 3rd parameters of the InitMqtt function)?
- MQTT: Both communication partners use the same MQTT broker (this is the 1st parameter of the InitMqtt function).
Picture sources
All pictures of the RevPi come from the website https://www.kunbus.de