Cooperation between Grafcet-Studio and S7-PLCSIM Advanced from Siemens
The following describes how Grafcet-Studio works together with the S7-PLCSIM Advanced from Siemens. The Grafcet engine is installed within an instance of S7-PLCSIM Advanced using the TIA portal, Grafcet-Studio can then access this instance via TCP/IP and transfer any GRAFCET. Operation is therefore similar to that of a real S7-1500 from Siemens. In the example, the S7-PLCSIM Advanced version 5.0 Update 2 is used. All components (S7-PLCSIM Advanced, TIA Portal and Grafcet-Studio) are located on the same PC.
Important
S7-PLCSIM Advanced is not the integrated PLCSIM of the TIA Portal. S7-PLCSIM Advanced offers extended simulation options for PLC programmes for the S7-1500. The S7-PLCSIM Advanced software must be purchased in addition to the TIA Portal. Information about S7-PLCSIM Advanced
The procedure is explained using a small example.
Step 1: Starting S7-PLCSIM Advanced and setting the communication path
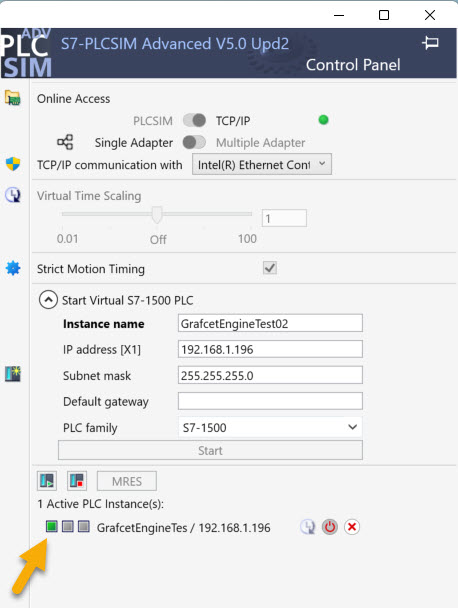
After starting S7-PLCSIM Advanced, the communication mode (Online Access) must first be set. To do this, set the switch to the "TCP/IP" position (point 1).

The network card of the PC must then be selected (point 2); this then also specifies the number band for the IP addresses.
Step 2: Creating a new instance in S7-PLCSIM Advanced
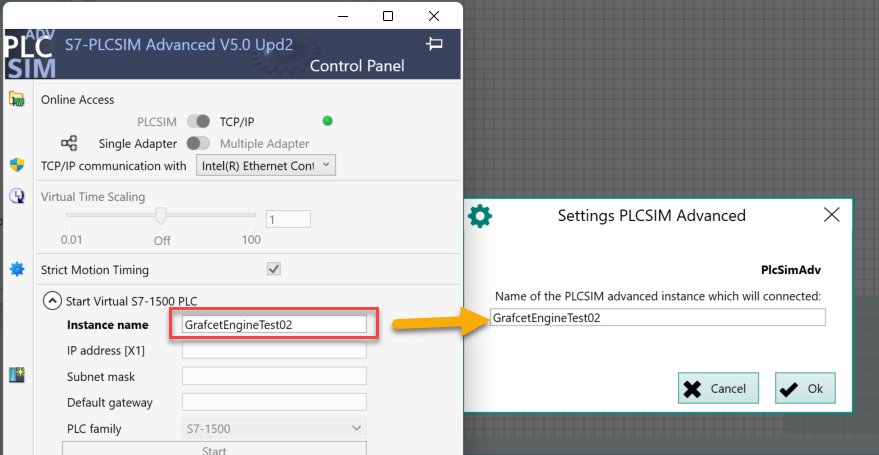
The instance of an S7-1500 CPU is now created. An instance name must be specified to identify the instance.
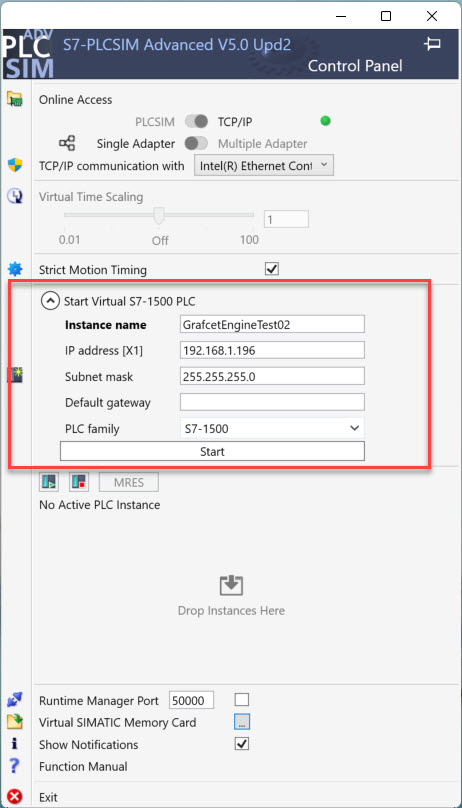
A free address within the subnet of the network card selected above must be entered as the IP address. In the example, the network card has the IP address 192.168.1.114. This means that the IP address of the CPU instance should only differ in the last digit of the address. In the example, the address 192.168.1.196 is used and the appropriate subnet mask for the subnet is specified.

Once the data has been entered in full, the instance is activated by pressing the "Start" button (point 1). After a short time, it is displayed in the list of active instances (point 2). This fulfils the requirements for the CPU to be addressed by the TIA portal.
Step 3: Open the Grafcet-Engine project in the TIA Portal and install the Grafcet-Engine in the instance of S7-PLCSIM Advanced
Important
To use the Grafcet engine within S7-PLCSIM Advanced, the version from 2024 must be used. Please download the latest version for the S7-1500 from the following link: Download TIA-Portal templates
After starting the TIA portal, the project is opened with the Grafcet engine. This project will possibly first be upgraded to the version of the TIA portal.
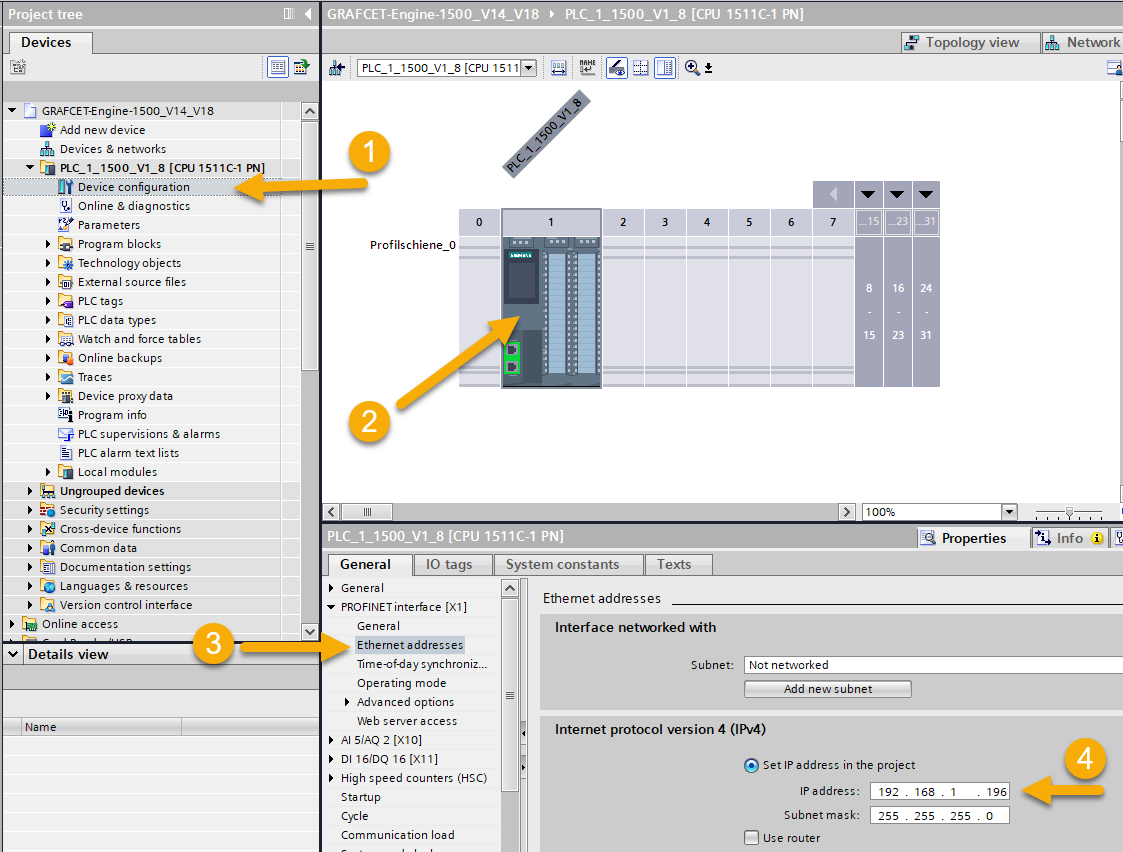
In the project view, open the node of the station and double-click on the "Device configuration" entry to open it (point 1). Then double-click on the CPU to display its properties (point 2). The properties of the CPU are then visible below the module display. The IP address of the CPU is entered in the "Ethernet addresses" section; the address 192.168.1.196 previously defined in S7-PLCSIM Advanced must be entered (point 4).
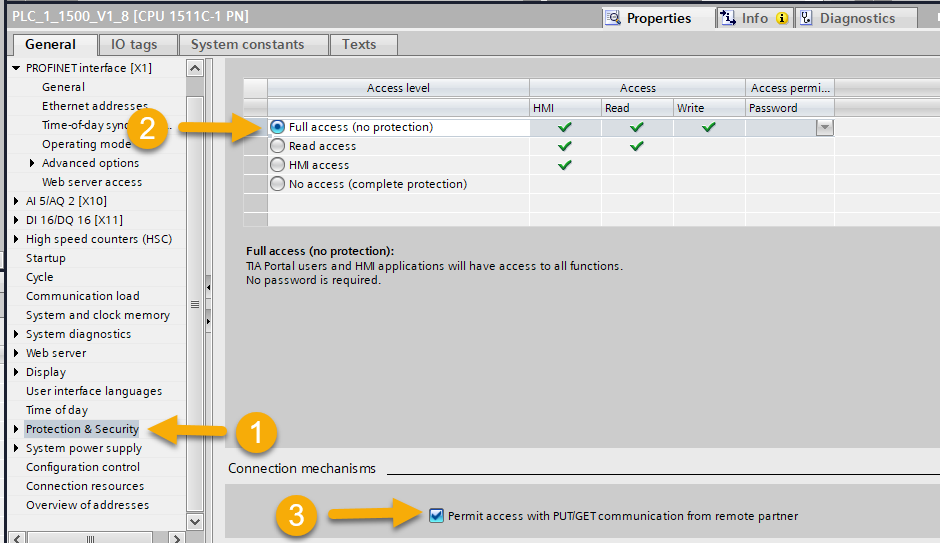
In the "Protection & Security" section, select "Full access" (point 2) and the "Permit access with Put/Get-..." option must be selected in the "Connection mechanisms" (point 3) must be selected.
Important
If a different S7-1500 CPU and other I/O modules are to be used, the CPU must be replaced and the I/O modules added accordingly.
This completes the necessary settings and the project can be compiled.
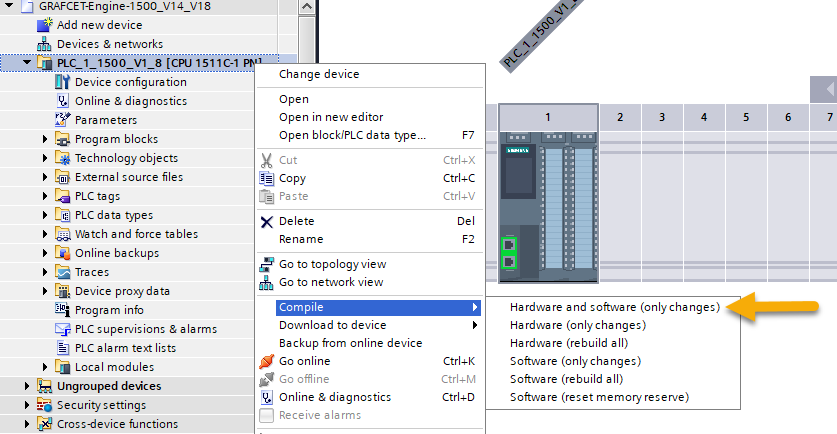
The project must then be transferred to the CPU.
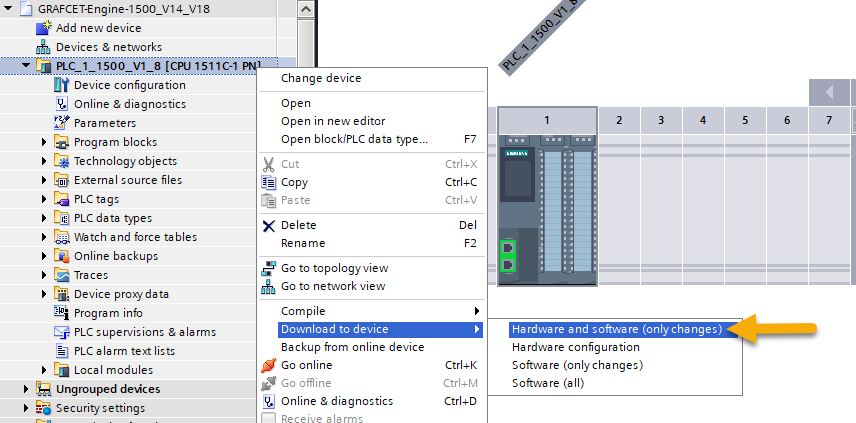
The "Go online" dialogue appears as a result.
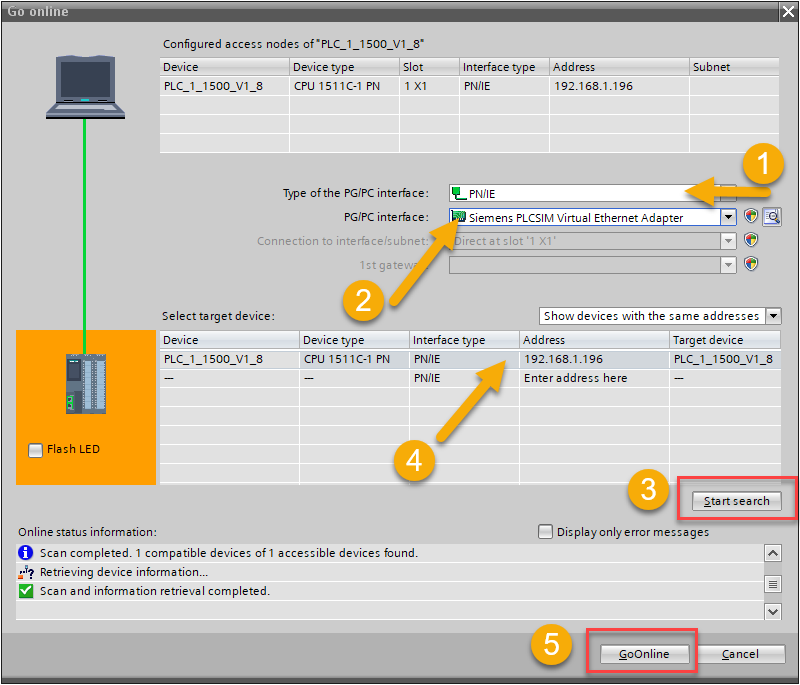
First select the type of PG/PC interface to be used in the dialogue (point 1). The type "PN/IE" must be selected.
This is followed by the selection of the PG/PC interface (point 2). The "Siemens PLCSIM Virtual Ethernet Adapter" must be selected here. The search is then started using the "Start search" button (point 3). The devices found are listed in the table; the appropriate entry must be selected here (point 4). Loading is then triggered via the button "Go online" (point 5).
If the loading was successful, the CPU instance is transferred to the run state. This new status can also be seen in the display of the instance in S7-PLCSIM Advanced.
Step 4: Start Grafcet-Studio, develop the GRAFCET and transfer the GRAFCET to the instance of S7-PLCSIM Advanced
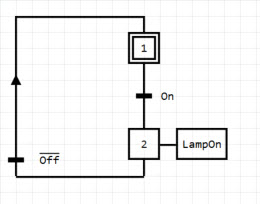
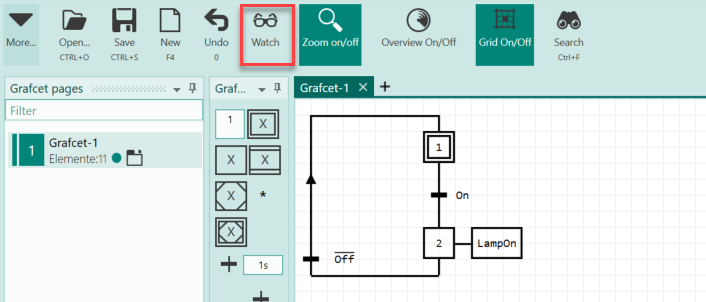
Now start Grafcet-Studio and create a new project. Two input operands with the symbols "On" and "Off" are required for the project, as well as an output with the symbol "LampOn". The inputs are assigned the addresses I0.0 and I0.1, the output has the address Q0.0.
These operands are used in the GRAFCET shown below.
Once the GRAFCET has been built, the next step is to create a new device, which then establishes the connection to the S7-PLCSIM-Advanced.
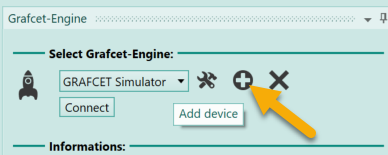
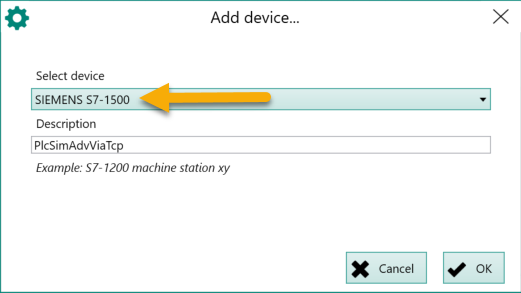
To do this, press the button shown in the image above. As a result, the "Add device" dialogue appears, in which the "S7-1500" device is selected. The designation is arbitrary, in the example "PlcSimAdvViaTcp" is specified.
The dialogue for the settings is now visible.
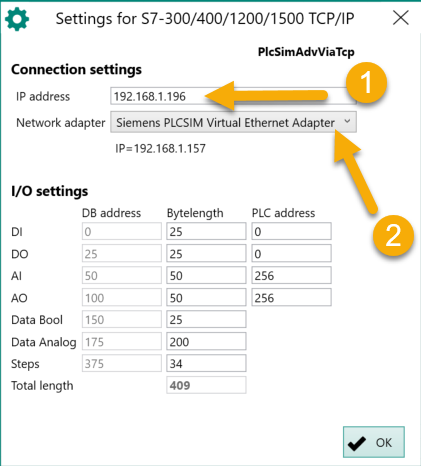
The IP address of the instance must first be entered here (point 1), in the example this is the address 192.168.1.196. The "Siemens PLCSIM Virtual Ethernet Adapter" must be selected as the network adapter (point 2).
Then confirm the dialogue by clicking OK.
The connection to the device can now be established by clicking on the "Connect" button shown below.
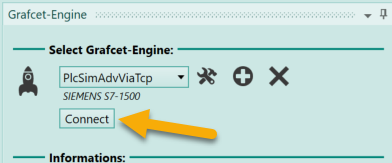
Once the connection has been established, the "Grafcet-Engine" tab has the appearance shown below (point 1):
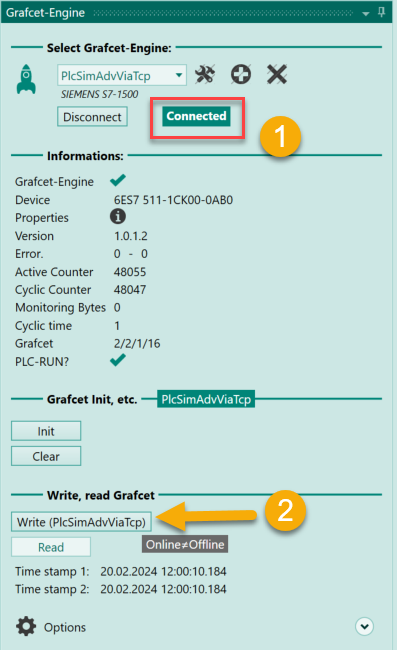
The GRAFCET can be transferred to the CPU via the "Write" button (point 2).
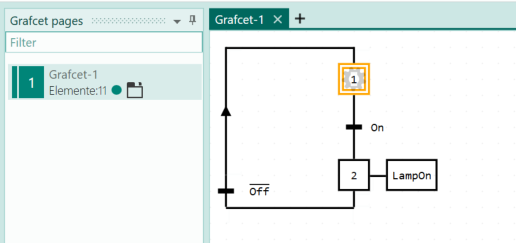
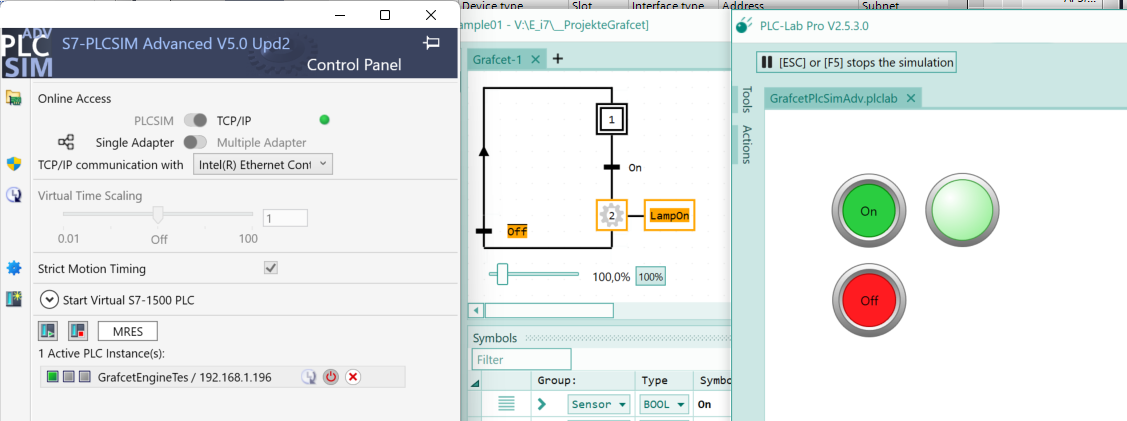
The GRAFCET is thus located in the CPU instance of S7-PLCSIM Advanced and is processed there. This also makes it possible to monitor the status of the Grafcet:
The GRAFCET can now be tested in the CPU and added to in Grafcet-Studio.
Optional step 5: Starting PLC-Lab and drawing the test environment
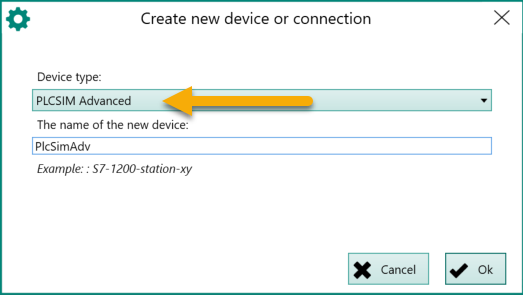
If you want to test the GRAFCET with a virtual test environment, PLC-Lab can be used. After starting PLC-Lab, a new device must be created within the symbol table:

The device is of type "PLCSIM Advanced" and is given any designation.
After confirming the dialogue, the settings of the device are displayed. The name of the PLCSIM Advanced instance to be addressed by PLC-Lab must be specified.
After confirming the dialogue, this device is created and must be set as the active device in the symbol table. This ensures that the generated symbols are assigned operands from this device.
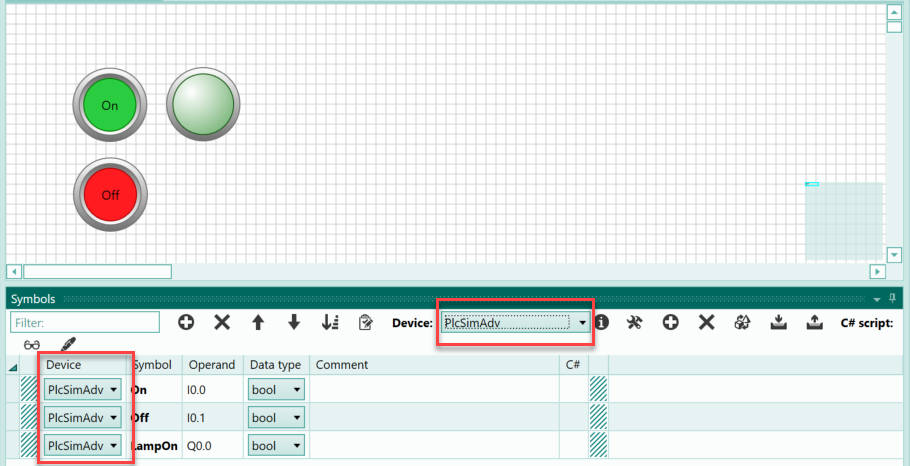
The three required operands are then created and linked to the buttons and lamps used for the test environment. Please note that the switch objects must be configured as push-buttons. The "Off" push-button must also be set as a normally closed contact (NC).
PLC-Lab can now also be switched to Run and the GRAFCET test can be started.
Important
In the example, PLC-Lab communicates directly with the CPU instance of S7-PLCSIM Advanced. This works because PLC-Lab is located on the same PC as S7-PLCSIM Advanced. If this is not the case, the CPU instance can also be addressed via TCP/IP. To do this, a device of the type "S7-1500" is created in PLC-Lab and the IP address of the CPU instance is specified in the properties. Communication then runs in the same way as with a real S7-1500, although the refreshing of the process image on the input modules must then be switched off.
Conclusion
The example has shown how the Grafcet engine is installed in a CPU instance of S7-PLCSIM Advanced using the TIA portal. Grafcet-Studio can then programme this CPU via GRAFCET, as is usual with a real S7-1500. In addition, PLC-Lab can work with this instance to provide an additional virtual test environment for the GRAFCET.